DIY Skateboard Swing
Are you looking for new creative ideas ? Here’s a cute achievable
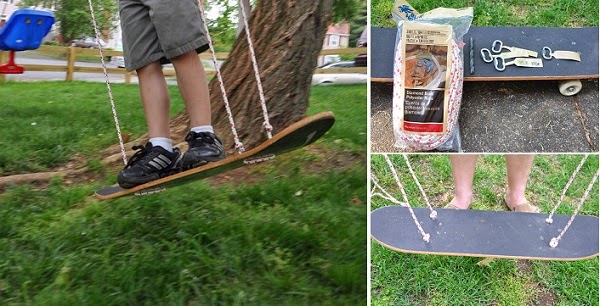
craft project in just 20 minutes. The Skateboard Swing is good solution
for this summer. First, grab your old skateboard or ask around the
playground for one kids recently broke its wheels. You will use it to
install some hinges and go some rope through it. Making a swing like the
one featured here is quite simple. The
pictures provided should be self-explanatory. But to be certain you do
the proper DIY project, follow the full instructions from the tutorial
(see in the link below) and you too can have a creative skateboard swing
right in your backyard!


20 minute crafter--Skateboard Swing!!


I saw this idea months ago on Pinterest...but every link that I found
led to a swing set company. Boo!!! A quick search there will show you
the link that I am talking about. I just knew that I could make one
myself and that my boys would love it! Both turned out to be true!
Want to make one?

You need:
a skateboard (I waited to find one at goodwill and scored this one for $3!!)
rope (from Lowe's--pay attention to the weight limits)
a 3/8 drill bit (this was the biggest we had--we took it to Lowe's to match it to the width of the rope)
2 of those metal things--I have no idea what they are called but they are oval with a way to screw it closed
a dowel big enough to drill a 3/8 hole through

Get your first helper to remove the trucks and wheels from the skateboard.

Get your other helper to drill holes 2in from the sides of the
skateboard. I centered the new holes in between where the holes from
the trucks were.
(Also, allow your three year old to drill at your own risk).

Like this. :)

Grab your dowel and cut it into two equal lengths. I made mine a little wider than the skateboard.

Drill holes through each about an inch from each end.

Cut your rope in half. Thread your ropes through each side as shown
above...keep the ends even, center the board in the middle of each
rope.

Put a knot above each hole. Don't tie your knots too tightly, because you may need to adjust them later.

Add your dowels...

...with a knot before and after the dowel.

Attach your rope to your metal do-dads. Here is how we did it. I am
not a knot expert. The metal part ends up being the part that sits on
the top of the tree branch you hang it from and helps to keep it in
place. :) You may need to adjust your knots a little and level the
whole thing out and then...

Hop on and...

...swing...


...swing...

...swing...


...swing!!!! Have fun making your own!!


